How to Do Deck Cleaning Without a Power Washer

Deck Cleaning Charleston SC is a task that should be completed regularly to help extend the life of your outdoor space. It helps to eliminate mold, mildew, and other fungi that can lead to serious wood problems such as rot.

Deck Cleaning

Start by removing all furniture and other items from the deck. Sweep the deck thoroughly to remove large chunks of dirt, cigarette butts, leaves, and other debris.

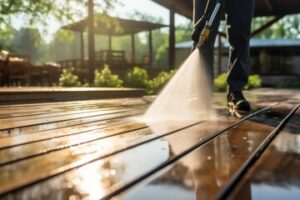
You can use a scrub brush and garden hose to clean your deck, but you will get much better results with a power washer. Power washing is a quick way to blast away dirt, debris, mildew, and algae, and it also gets into tight spaces that are difficult to reach by hand. This method is especially effective if you plan on staining your deck, as it ensures that the stain will adhere and soak into the wood properly.

The first step is to prepare the surface for cleaning by sweeping it and using a soft brush to get rid of any stuck-on debris. Next, mix your cleaner according to the instructions on the label. Generally, you should start with a higher pressure setting and work your way down to the lowest. It is important to test the spray nozzle on a hidden area of your deck before starting to make sure that it will not damage the wood. A wide nozzle is typically best for this task, as it can be used to wash a large area without damaging the surface.

Be careful when using a power washer because the hot water could damage or weaken the structure of your deck. If you notice that any areas of your deck are showing signs of damage, such as warping or cracking, it is important to repair them before you begin the cleaning process. If you do not repair these problems, they will only get worse over time and may result in a collapsed or unsafe deck.

If you are not comfortable using a power washer, you can always hire a professional to do the job for you. However, it is important to find a company that uses risk-free techniques and asks detailed questions about the type of deck you have. Too many companies treat every deck the same, which often leads to cheaper costs on the front end but expensive repairs later. To avoid this problem, be sure to choose a professional that is experienced in cleaning Trex and wood decks. It is recommended to have your deck power washed on a semi-annual basis (spring and autumn), or as needed to keep it looking its best.

Dish Soap

If you want to clean your deck without using a power washer, there are plenty of safe DIY cleaning solutions that will get the job done. First, sweep the surface of the deck and remove any debris that has accumulated on the wood. You can use a broom or a specialized deck scrub brush for this purpose. It’s also a good idea to move furniture, plants, grills, and other equipment that may be in the way while you’re working.

Vinegar is an all-natural cleaner and deodorizer that will remove dirt and grime from the surface of the deck. It’s not recommended, however, for use with stained decking as it will leach the color out of the wood. A diluted mixture of vinegar and baking soda will kill mold, however, and can be used to wipe down the wood surface after sweeping.

A basic mixture of warm water and detergent is another effective homemade deck cleaner. Powdered laundry detergent, such as Borax, is a great option as it serves as a cleanser and an abrasive and can be mixed with bleach to fight grease stains on deck surfaces. It is important to wear rubber gloves when mixing and applying this solution as it can cause skin irritation. You should also avoid mixing ammonia-based ingredients with bleach as this creates toxic chloramine gas that can irritate the eyes, nose, mouth and respiratory system.

To make this deck cleaning solution, fill a one-gallon bucket with warm water and add 2 cups of powdered oxygen bleach (such as OxiClean, found in the laundry aisle at your local grocery store). Stir this solution gently until all the oxygen bleach is completely dissolved. Then add 1/4 cup of liquid dish soap and stir to distribute it throughout the solution. This solution will effectively clean your deck and kill mildew, algae and moss, while preventing the growth of wasp nests and keeping yellow jackets away. As an added bonus, this solution is environmentally friendly and won’t damage garden greenery if accidentally splashed onto nearby plants. It is also gentle enough to be used as a yearly maintenance treatment in between more intense scrubbings.

Oxygen Bleach

A deck cleaner containing oxygen bleach will kill mildew and residue on your deck without damaging the wood. These cleaners are also non-toxic for plants and people, unlike chlorine bleach. However, since they are still bleach cleaners you will want to wear protective gear like gloves and goggles. You will also want to saturate your deck and water any plants before using the cleaner so it does not wash away or burn them. You will also need to scrub the deck with a long handled stiff bristled brush for this type of cleaning. Before you start washing your entire deck, test the cleaner on a small area of the deck. If the solution works well, it should kill the mildew and dissolve the dirt within 15 minutes.

To clean your deck with a DIY oxygen bleach solution, mix one tablespoon of powder with a cup of water. Apply the solution to a scrub brush and use it to rub away mold or mildew stains on your deck. After you’ve finished scrubbing, rinse the deck with a garden hose and allow it to dry completely before applying additional treatments.

Another option for a DIY deck cleaner is sodium percarbonate, commonly known as OxiClean. This product comes in a powder form that you stir into a bucket of warm water. It will release oxygen ions that attack the molecules of stain and dirt, blasting them apart. It is less effective than chlorine bleach at removing sun damaged grey fibers, but it will work if you’re willing to put in some extra elbow grease and soak the deck for longer periods of time.

Vinegar is another simple and natural solution to clean a deck. It is safe for composite and wood decking, and it will not damage the wood or leave behind harsh chemicals. You can use vinegar to kill mildew and remove mildew stains from your deck. This homemade deck cleaner is easy to make and requires only a few ingredients that you probably already have in your home.

OxyClean

If you’re concerned about the environment and prefer to use a non-toxic cleaner on your deck, try an oxygen bleach like OxyClean. Unlike chlorine bleach, which has the potential to poison plants and pollute natural waterways, OxyClean dissolves in water, leaving behind nothing more than oxygen and sodium carbonate (sodium percarbonate). It also works well for a wide variety of stains and spills. Mix your cleaning solution with warm water and scrub it into a damp surface with your brush or sponge. The bubbling action loosens stain molecules from the fibers of your deck, making it easier for you to rinse away the dirt and grime.

Make sure your deck is empty of chairs, grills, and other equipment before starting your cleanup. If you’re working on a large area, you may want to divide it into sections and work one section at a time. This helps prevent the buildup of soap scum and hard-water deposits between cleanings.

Rinse the deck thoroughly with a garden hose to remove as much loose debris as possible. This will help the clean-up process go more quickly and leave you with a fresher-looking deck.

Pour or spray your deck cleaner over a small test area of your deck to confirm that it is safe for your wood. You can purchase a deck cleaning kit that will include a sample of your chosen cleaner. Follow the manufacturer’s instructions for applying and rinsing the product, which is typically left to sit on your deck for 10-15 minutes before being rinsed off.

Once the deck is completely dry, you can apply a penetrating sealer. This will protect it from harsh UV rays, wet/dry cycles, and temperature variations that can shorten its useful life.

Although composite decking requires less maintenance than wood, you should still clean and reseal it once or twice a year to keep it looking fresh. Be sure to apply a good quality penetrating sealer that is appropriate for your type of deck.

What Does a Brick Masonry Job Entail?

Brickmasons construct walls and other structures using masonry. They use various tools and techniques to ensure their work meets quality standards. They also prepare the area and dig a trench before beginning. They must mix mortar, cement, and sand, to the right consistency.

Brick Mason

Brick Masonry Charleston SC is used to create a strong foundation for structures. These include houses, schools, and other buildings. Bricks come in various sizes, shapes, and colors and can be combined in different ways to create unique building designs.

The first step in laying a foundation for a brick wall is to dig a trench. This should be at least a foot deep and wide. It should also be checked to ensure that it is straight and level.

Next, the mason must prepare mortar, which is a combination of cement, sand and water. Brickmasons need to know the correct proportions of each ingredient to achieve the desired consistency for the project at hand.

After mixing the mortar, brickmasons begin laying the foundation bricks. They should follow the plans for the project and use trowels to ensure that each brick is properly positioned and that the mortar is smooth. They may also employ different bonding patterns, depending on the requirements of the project.

Once the first course is laid, brickmasons should use a tool called a jointer to smooth out the mortar joints between the bricks. This can be done by using a piece of copper pipe, a wood dowel or even a broom stick. The curved end of the tool is used to rub along the mortar joints, making them smooth and uniform.

When the mortar is dry, brickmasons should spray it with water to prevent the formation of cracks or other damage. This process is called hydration and it is essential for the long-term durability of the finished product. It is recommended that bricks are hydrated for up to eight hours. The process of hydration makes the bricks stronger and more durable, while also increasing their resistance to movement and shrinkage.

Creating a Trench

Before starting brick masonry, the site must be prepared. This includes clearing the area of any debris and ensuring that there are no underground services that may interfere with the construction of the wall. It is also important to test for buried gas, water, and electrical lines. If they are present, they must be marked and de-energized.

Next, a trench must be dug. This should be several inches wider than the width of the bricks you are going to use. It should be deep enough to allow for a layer of paver base and another of stone dust. You should then tamp down this mixture with a tamper to make sure it is firm.

It is a good idea to place tarps over the grass while digging so that any soil that falls off will collect and be easy to collect later. You should also check the soil conditions to ensure that it is stable. If it is loose, you should consider putting down a layer of concrete as an alternative to a brick foundation.

Once the trench is ready, it’s time to begin laying the first course of bricks. It is important to get this course straight and even, as it will set the tone for the rest of the wall. A crooked brick in the first course can throw off subsequent courses, and this can lead to an unattractive finished product.

To help with this, you can string a mason’s line, using line blocks to hold the line flush against the face of the bricks. This will allow you to see the height of each brick in the course, so that they are all identically aligned.

Laying the First Course

Brickmasons work on construction sites to build walls and other structures. They start by clearing debris, setting up scaffolding or ladders, and preparing the work area. They may also need to excavate and dig holes to lay the foundation for their masonry projects. Once the work area is ready, they begin by mixing their mortar — a combination of cement, sand, and water. Masonry professionals have a strong understanding of the different types of mortar, as well as how to mix it to achieve the appropriate consistency for their specific projects.

Once the brick wall foundation is complete, a mason begins to lay its first course (also known as a wythe). They start at either end of the brick structure and build their way up. When they reach the point where they want their pillars to start, they set up a string line at the height the pillars should be. Masons then move the string line up as they continue to build their wall, making sure the row is level with the gauging rods.

After laying each row of brick, a mason will use their trowel to remove any excess mortar. They will also use a jointer tool to smooth the head and bed joints between bricks once the mortar has set. This tool is a piece of tubing that has the same diameter as their joint spacing and is bent in an “S” shape. It can also be made out of copper pipe, galvanized steel, or a wooden dowel.

Once a mason has finished building their wall, they will then apply a layer of tar to the top for protection against weather elements. They will then add a concrete backer board to the bottom of the wall for support and to make it stronger.

Creating the Second Course

In order to succeed as a bricklayer, you must have physical stamina and strength. This is because you spend a large amount of your work time on your feet, carrying heavy materials and working with tools. You also often need to climb ladders or scaffolding and rely on your hands, knees, and arms for lifting and balancing purposes. Masons also frequently work with heights and require good visual awareness. Additionally, the job can be very demanding and requires a great deal of attention to detail.

Once you have laid your first course, it is important to ensure that the second course is aligned with the rest of the wall. You can do this by creating guideposts, which are long wooden boards that measure out each row of brick, also known as a course. Using these guides will help you to ensure that each course is aligned with the previous row.

When you are ready to begin laying the second course, make sure that your line blocks and pins are in place and secure. Also, ensure that your string line is set at the right height. The next step is to lay your bricks, making sure that the mortar joints are buttered and that the bricks meet flush with each other.

Then, once you have finished laying your bricks, it is crucial to check the level of each column and make any necessary adjustments. This is because a misaligned brick can have serious consequences for the overall structure of your brick wall. If the wall isn’t level, it’s important to catch the problem early on so that you can correct it before the mortar dries.

Adding the Finishing Touches

Brickmasons often work on construction sites, collaborating with architects, engineers, contractors, and fellow tradespeople to ensure that the brickwork aligns with overall project specifications. They also use their skills to prepare the work area, including clearing debris and setting up scaffolding or ladders. In addition, brickmasons must be able to read and interpret blueprints in order to accurately visualize the required wall dimensions, bonding patterns, and other specific details.

As part of the bricklaying process, brickmasons use trowels and other tools to apply mortar between each brick, ensuring that the bricks are properly spaced and aligned. They may employ a variety of different bonding patterns, including running bond and Flemish bond, depending on the project. In some cases, they may cut bricks to fit openings in walls or create angles and other specialized features. When necessary, they can also use power saws to shape bricks and other building materials into the desired shapes and sizes.

Unlike stone, which is heavy and difficult to transport, bricks are much lighter and easier to move around the worksite. In addition, bricks are cheaper and more versatile than stones or concrete blocks. This versatility makes brick masonry a good option for building a variety of structures, including buildings and retaining walls. It is also ideal for creating a wide range of finishing textures, colors, and designs. However, despite its many advantages, brick is prone to water penetration, and it requires regular maintenance to prevent further damage. In addition, it has a low resistance to tension and torsion loads, which can cause structural problems. To prevent this, builders use cavity walls, which separate the outer layers of bricks from inner support structures, such as poured concrete or another brick wall.

What Is Trash Collection?

Armadale Rubbish Collection should occur regularly on a schedule and it should be easy for people to get their trash bins out on time. Ideally, residents should use plastic trash bags rather than metal cans as they are quieter and easier to lift for sanitation workers.

Some cities charge a flat fee for rubbish collection (usually collected through building water bills) and create financial incentives to produce less waste. Others charge based on the volume of refuse set out for pickup.

The word rubbish is generally understood to mean anything that is unwanted or unusable. It can also be a slang term for nonsense, as in “that speech is complete rubbish.” However, it can also be used figuratively to refer to something that is not true or accurate. For example, the claim that the earth is flat is utter rubbish.

In general, rubbish includes combustible waste like paper, boxes, glass and crockery, metal scrap and tin cans and non-combustible waste like wood and greenery. It can also include hazardous materials, such as asbestos and chemicals, that require special handling and disposal.

Rubbish collectors are a vital part of our waste management system. They work hard to maintain a clean environment by collecting waste regularly from households, businesses and public spaces. They follow carefully planned routes to ensure no area is overlooked. Their commitment to maintaining a clean and hygienic community is inspiring.

It is important to keep rubbish bins free from overflowing waste, as this can cause environmental and health issues. It is also important to separate rubbish into different categories, so that recyclable and non-recyclable items can be separated. Recycling helps to reduce the amount of rubbish that ends up in landfills and conserves natural resources.

If we recycle as much as possible, we can greatly reduce the amount of rubbish that is collected and disposed of each year. Educating our communities on the importance of waste separation and recycling can help to encourage sustainable practices.

Once rubbish is collected, it is transported to a sorting facility where it is segregated into different categories. Recyclables are sent for processing, while non-recyclables are disposed of responsibly in landfills. It is important to recycle as much as possible, so that we can minimize the impact on our planet’s ecosystems.

A good way to support the rubbish collectors in our community is to show them our appreciation. Simple acts of gratitude, such as leaving a thank-you note or smiling at them, can go a long way in showing that we value their hard work.

Although the terms trash can, garbage can and rubbish bin may be used interchangeably, they actually differ slightly. Trash cans and garbage cans are primarily found in East Coast America, rubbish bins are more often found in Britain, and waste bins are commonly used in many other parts of the world.

The rubbish bin, also referred to as the black bin or general waste bin, is used for any items that don’t fit in your recycling bins, food waste bin and glass crate. This includes any paper and plastic without a logo or with the word ‘recyclable’ on, any tins, cans or glass that don’t have a lid, and any other non-recyclable items such as sanitary products, foil, batteries, old tyres, tea bags and coffee grounds.

Putting the wrong things in your bins can increase the cost of waste disposal and hurt the environment. This is why it’s so important to understand which bin your waste belongs in and always check before you put something out for collection.

We’ve compiled a handy A to Z list of what can and cannot go in your different bins. This will help you make sure you’re Bin It Right every time, and reduce the amount of waste you throw away.

When it comes to your Blue Bin, it’s worth mentioning that it doesn’t take much to contaminate a batch of recycling, and this is costing the City millions of pounds annually! To avoid this, please ensure that your recycling is fully rinsed and empty before placing it in your blue bin.

If you’re concerned that you don’t have enough space in your kitchen to store a rubbish bin, why not think about putting one outside the back of your house or apartment? Or maybe even in the bathroom! This will ensure that you’re never far from a bin to dispose of your rubbish, and you won’t end up with trash sitting around the place. This is better for the environment than throwing it out with your general waste bin.

The rubbish is collected from homes and businesses by councils or private waste collection companies. The rubbish is transported to waste treatment facilities, which can be landfill sites or incineration plants. Non-recyclable waste is disposed of in landfill, while recyclable waste is sorted and sent to recycling centers.

The amount of rubbish produced in the world is staggering, and it’s the responsibility of local councils and waste management companies to make sure that it’s disposed of in a responsible manner. Each country has its own laws and regulations concerning rubbish, so it’s important to know the rules in your area.

Rubbish is usually collected once or twice a week, depending on the area. In hot climates, rubbish may need to be collected more frequently in order to prevent fly breeding and odours. However, it’s also important to have enough space in the rubbish bins for each type of waste, as overfilling them can cause a blockage and delay the collection of other types of waste.

In some areas, communal rubbish bins are provided for residents to use. These are often located in public spaces, such as streets or parks. Individual households should place their rubbish in the designated bins each week to avoid blockages or delays. Ideally, waste should be placed out the morning of the collection day so that it can be easily collected by the refuse collectors.

Many cities use large receptacles on the sidewalk to collect household trash and recycling. Some even have pneumatic tubes that whisk waste away, a system that’s being tested at Roosevelt Island and Hudson Yards. 

They have recently changed the time when garbage and recycling can be set out for pickup. The change means that residents have two hours longer to put out their trash, which could help reduce the number of rats in the city. In addition, residential buildings with nine or more units can now opt in to a 4 p.m. to 7 a.m. set-out window for garbage, recycling, and organics, as well as bundling their cardboard to make it easier to carry away.

In the vast majority of places, rubbish is collected by a private entity on behalf of local governments or municipalities. Residents pay for trash collection in the form of tags or taxes, and the entity processes the waste it collects to ensure that recyclable materials are separated from non-recyclables, and that a majority of the waste is sent away from local landfills.

Trash is usually taken to a waste transfer station, which is basically the first stop on the road to the landfill. Here, the garbage is meticulously sorted by workers or sophisticated machines. The goal is to separate out organic material, paper, plastic and metals for further processing or disposal. The items are also washed to remove contaminants such as ink, glue and the odd staple. They are then rolled into sheets ready for the next step.

A lot of people don’t think about where their garbage goes after it leaves their doorstep, but it does have a long journey to its final destination. Americans generate an average of 4.9 pounds of trash per person each day, which adds up to 292.4 million tons of solid waste a year. That’s 12 percent of the world’s trash, despite making up only 4 percent of the global population [source: EPA].

The majority of our rubbish ends up in landfills, and most of them are in states or countries other than where the waste originated. This is a shame because recycling, incineration and composting are all infinitely preferable to landfills, which create noxious gases and take up valuable space.

When trash reaches the landfill, it is covered in a layer of compacted soil to seal out air. The bacteria in the rubbish then break down the organic matter, producing methane and carbon dioxide as byproducts. Methane is a potent greenhouse gas, 28 to 36 times more effective than carbon dioxide at trapping heat in the atmosphere, so methane emissions are a big problem for landfills.

The landfill is also surrounded by a series of perforated pipes that drain out the leachate, which is water with contaminants, into a pond or other sewage treatment facility. Some of this is used to water the plants that cover the rubbish, and the rest is sent back to the site to reuse or for new construction.

Landscape Lighting – Add Beauty and Safety to Your Yard

Whether you want to set a festive mood for evening entertaining, highlight a garden bed or water feature, or reduce tripping hazards on the stairs, landscape lighting can add a sophisticated touch to your home. First, decide why you want to light your yard. Then, select the lights to fit your goals and budget. Be sure to consider the beam spread, lumens, and color temperature. Contact Orlando Lighting now!

Landscape Lighting

Illuminating walkways is important for safety, preventing trip hazards, and adding a warm and inviting atmosphere to your yard after dark. Path lighting can also highlight landscape features and plants along your walkway. There are many options for pathway lights, including spotlights, floodlights, and hardscape lighting. The key to creating a great lighting scheme for your walkways is to have the right balance of light intensity. Overly bright paths can look glaring and unpleasant, while too little light can create a spooky and unsafe feeling.

Spotlights, the most common type of landscape lighting fixture, come in various beam widths and wattages, making them a versatile option for your outdoor space. They can uplight trees, highlight a special plant, or create drama with objects or sculptures. The most popular spotlighting techniques include highlighting, silhouetting, shadowing, grazing, and moonlighting.

A more modern and versatile option for landscape lighting is hardscape lighting, which uses LED technology to wash or graze walls with light. It is available in many styles, from simple brackets to sleek orbs. Hardscape lights are a good choice if you want your walls to shine with soft light but need more time or budget for an elaborate lighting project.

Pathway lighting is also excellent for highlighting specific landscape elements, such as a water feature, statue, or garden decoration. The most common pathway lighting technique is simply placing fixtures in a line, but if you have an irregularly shaped path or want a more natural-looking effect, consider stabling your lights instead.

One final note about path lighting is that it is important to understand how far apart to place your fixtures. Too far apart, and they won’t illuminate your walkway, but too close, and they may create a “runway” effect that looks unsightly. This is another reason to get a professional opinion when designing your lighting system; they can help you figure out the perfect spacing for your needs.

Landscape lighting adds drama and beauty to a home while also increasing safety. While it is not always the first feature that homeowners consider when planning a landscaping project, it should be part of the process from the beginning. It can help guide family members and guests safely while enhancing your property’s curb appeal.

When done well, the right landscape lights create a warm and inviting glow that doesn’t make you think about the fixtures themselves. But how do you achieve that effect? It combines techniques that all begin with the same principle: focusing light on a specific object.

For instance, you can use uplighting to emphasize a large tree by shining light at the base of the trunk and extending the illumination through the canopy. Uplighting is great for trees because it highlights their shape and can create beautiful, dramatic shadows.

Other objects that can be highlighted with this technique include special or unique features such as a sculpture, fountain, statue, or garden structure. Similarly, this technique is often used to draw attention to a garden plant. Another way to highlight something is through backlighting. This is accomplished by placing a lighting fixture behind the item to be illuminated and focusing light on it from a lower angle so that the source of the lighting cannot be seen.

Downlighting is another common landscape lighting technique, and it is the opposite of uplighting. This type of lighting is focused downward to shine on the ground and other low-level objects. It can be used to highlight stairs and walkways and is ideal for areas frequently used after dark.

Downlighting is also an excellent way to highlight architectural features such as columns, walls, or other structures. In addition, it can be used to add depth and dimension to a yard. There are a variety of landscape lights that can be used for this purpose, including spotlights and floodlights. Specialized lighting options, such as restaurant and tiki torches, can be positioned on the ground or attached to items such as plants or trees.

When planning a landscape lighting system, it is important to consider the lights’ function and aesthetics. For example, a deck with stairs must be well-lit for safety reasons. The same goes for a meandering path or a fountain that needs to be lit so you can enjoy it day and night. This functional landscaping helps ensure family and guests can safely move about your property without the risk of injury.

There are plenty of ways to add accent lighting for the rest of your landscaping. This can include up-lighting to create shadows that play off of vertical features like trees, statues, and other tall structures, wash lighting (which illuminates an area with a wide beam that minimizes hot spots and density), and spotlighting to show off a particular plant specimen or architectural detail.

Accent lights are essential to any landscape lighting design, and the right fixtures can make all the difference. Look for LED light fixtures that consume less energy and last longer than traditional bulbs. Durability is also key; choose fixtures made from corrosion-resistant materials like copper or brass that won’t rust when exposed to salt spray and harsh weather.

Another great use of landscape lighting is highlighting water features like ponds and fountains, yard sculptures, and ornamental shrubs. The right lighting can showcase these elements, highlighting their texture and color and giving them new life after dark.

Finally, remember that lighting can highlight other outdoor features on your property, including patios and pergolas, flower beds, garden walls, and walkways. With the right fixtures, you can transform any space into a bold, illuminated showcase that shows off your unique style and impresses your guests.

Professionally done landscape lighting is a great way to get the most out of your home and yard while adding curb appeal to help it stand out when it comes time to sell. It is a relatively inexpensive way to increase your home’s value and create a warm, welcoming atmosphere for family and friends.

Landscape lighting should be multi-purpose – it should look great, boost curb appeal, and make your yard safe. That’s why it’s important to work with a professional who can consider your family’s and home’s needs. When you have lights in place that can light up walkways and stairs, your guests will feel safer wandering around the property after dark. In addition, security lights can act as a deterrent against burglars by alerting neighbors or passersby to anyone on the premises.

Many different types of landscape lights can illuminate your home or business. These include recessed lighting, wall-mounted fixtures, spotlights, floodlights, and solar bollards. When choosing a fixture, it’s important to consider its lumen output, beam spread, and color temperature. The bulb type will also play a role in the final result of your landscaping lighting.

I consider soffit and recessed lighting if you’re looking for a more natural approach to your landscape lighting. These lights can be installed in the eaves and on your house’s roof, giving it a more organic look. They are also good for areas often used at night, such as decks and water features.

Another popular option is to use hardscape lighting, which is small lights installed on or in outdoor structures like walls and fences. These lights are designed to wash walls with light and can effectively highlight a space’s texture, pattern, and depth.

With the right landscape lighting, you can highlight your home’s architectural features and showcase your prized plants and trees. The right combination of fixtures can turn your home into a nighttime showcase that will impress your friends and neighbors.

Navigation