Just like the reflective sunshade on your car, Radiant Barrier Houston redirects solar energy away from your roof. It prevents heat transfer and elongates the life of your HVAC system, ductwork, and holiday decorations.
There are many types of radiant barriers, including rolls of foil-like materials draped on attic rafters; sheet goods laminated to plywood or OSB sheathing; and spray-on materials. The key is to select a product with high reflectivity and low emissivity.
Radiant barriers are a type of thermal insulation that reduces heat transfer by reflecting radiant energy rather than absorbing it. They don’t reduce heat conduction as well as traditional thermal insulation materials do, however. They’re typically installed in attics to help keep cooling costs down.
Radiant barrier sheathing is usually used in new-construction homes as a replacement for plywood or OSB board. It has foil adhered to one side, and it works by decreasing the amount of energy lost through emissivity. It can also be used in older homes as an upgrade to existing insulation.
The best part about radiant barriers is that they don’t rely on absorbing heat like other types of insulation, which can make them more effective and cheaper. They work by deflecting the heat and preventing it from transferring to other surfaces, which makes them ideal for hot climates.
Because they’re so effective, radiant barriers can often cut cooling costs by 5% to 10%. That’s a significant savings on a 90-degree day, especially when your HVAC system is working harder to cool your home.
If you’re considering adding a radiant barrier to your home, it’s important to shop around for quotes. Prices vary, and some companies offer a package deal that includes radiant barrier installation along with other energy-saving measures. It’s also worth noting that radiant barriers won’t be as effective if they’re not used in conjunction with attic or wall insulation. In fact, combining radiant barriers with conventional insulation is usually the most effective way to reduce cooling costs. You can also find spray-on radiant barrier paint, but this isn’t as effective and may require professional installation to avoid damaging your roofing materials.
The Cost
While radiant barriers can be a great energy-saving product, the costs of installing them can make them not very cost-effective. It is important to compare prices between different contractors and products before making any decisions. Also, to maximize the benefits of the radiant barrier, it should be installed along with other insulation.
It is recommended to install a minimum of 10 to 12 inches of thermal insulation along with radiant barriers. This will help reduce the cost of cooling the home and increase the efficiency of the air conditioner. The US Department of Energy has stated that the use of a radiant barrier can lower cooling costs by 5–10 percent in warm climates.
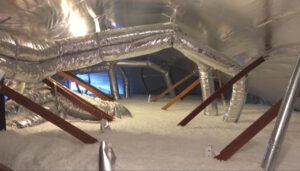
Radiant barriers are made of foil material that is placed over the rafters of an attic. This material reflects the sun’s heat away from the attic. This helps to keep the attic cooler and can even cut a home’s energy costs by up to 10%. Radiant barriers can be installed in new construction or in existing homes.
They can be used alone or with insulating materials such as batt or roll insulation. It is important to note that radiant barriers are most effective when they are installed in ventilated attics.
Radiant barrier installations are considered “green” technology, and some governments give homeowners a tax credit for using this product in their homes. However, it is important to note that this credit expires in 2016.
When considering a radiant barrier installation in your home, you should consider how much money the project will save and if it will pay for itself over time. The most cost-effective way to determine this is to perform a standard economic calculation. This will convert the expected future energy savings into present-value dollars and then compare this to the cost of a radiant barrier.
The installation process
Radiant Barrier is reflective foil insulation that is installed in an attic to help keep heat out. The way radiant barriers work is similar to the way a sunshade works on your car windshield: they send radiant energy from UV waves away from your house and back into the atmosphere. This helps reduce your cooling bills by lowering your attic temperature.
A properly installed radiant barrier can save you up to 25% in electricity costs. Depending on the size of your home and the amount of insulation in the attic, the savings may be greater.
You can install a radiant barrier in an attic in several ways, including by stapling it directly to the roof sheathing, applying it directly over existing attic floor insulation, or draping it over the rafters. Some methods may be more suitable than others depending on the climate, attic ventilation, construction stage, and where your ducts and HVAC equipment are located.
If you’re installing a radiant barrier in an existing attic, it’s important to leave a small area uncovered at the peak of the roof for proper attic ventilation. If you do not allow for adequate attic ventilation, the air inside your house can become stagnant and contribute to fungal growth. This can lead to health issues, especially if you have young children or elderly adults living in the house.
In addition to proper ventilation, it’s also recommended that you use high-quality attic insulation when installing your radiant barrier. This will help to increase your energy efficiency, further reducing your electric costs. In addition, it will help to keep your attic cooler and more comfortable. In short, a radiant barrier can significantly reduce your energy bills, making it worth the investment.
The Materials
For years, builders and HVAC installers in Sun Belt states have used aluminum foil sheeting in attics to reflect radiant heat away from homes. More recently, liquid radiation control coatings designed to be sprayed or rolled on have also been developed to help reduce summer heat gain in attics and throughout the home.
Radiant barrier products are made up of reflective building materials that primarily work to prevent heat transfer by radiant energy. Since heat can also be transferred through conduction and convection, most radiant barriers are paired with thermal insulation to slow down the movement of heat into and out of the building envelope.
When compared to typical insulation, radiant barriers have low emissivity and high reflectivity ratings. Emissivity is a measure of how much energy a material emits and is rated on a scale from 0 to 1. In contrast, radiant barrier products have emissivity ratings of 0.1 or less and are able to reflect 90% or more of the radiant energy that hits them.
Like the silver on a NASA spacecraft, a radiant barrier will reflect the radiant energy of the sun back into its atmosphere rather than into the home. In doing so, it keeps your attic cooler and can dramatically reduce your energy costs.
A radiant barrier can be installed in conjunction with conventional cellulose and fiberglass batt insulation to offer superior attic performance. However, it is important to note that radiant barriers cannot be installed over existing fiberglass insulation that has been compressed, as doing so significantly decreases its R-value and makes it ineffective. When installing over a compressed fiberglass batt, it is recommended that the installer add a new layer of insulation above the existing attic floor joists to ensure the integrity of the attic floor and prevent any moisture penetration.
The Warranty
Unlike traditional insulation, radiant barriers do not conduct heat. Instead, it reflects the heat that radiates from the roof into the attic and home. Because of this, it conducts 97% less heat than blown-in insulation. As a result, energy bills are significantly reduced, especially in warm climates such as San Antonio.
In addition to cutting down on energy bills, radiant barriers make attic space more useful for storage or as a workshop. This can be particularly important in homes with limited attic space or for those who have converted their attics into living spaces.
While it is not possible to calculate exactly how much savings homeowners can expect to see, computer studies conducted in Florida indicate that a typical attic radiant barrier offers a six- to seven-year simple payback and a 15 percent to 19 percent return on investment. The savings can even exceed this amount in some cases.
A radiant barrier can also save money by lowering the cost of solar power installation. The lower energy use from radiant barriers enables homeowners to qualify for a smaller solar panel setup, reducing the upfront costs of the system.
The installation process is relatively straightforward. For existing attics, the radiant barrier is stapled to the underside of the attic truss chords. The easiest method of installing a radiant barrier in new construction is to attach the foil material to the attic deck or truss chords after the roof decking and drywall have been installed but prior to the installation of ceiling drywall.
When working in an attic, it is important to wear protective equipment such as safety goggles, a long-sleeved shirt, and a face mask or kerchief over the nose and mouth. It is also a good idea to take frequent breaks and work slowly.